Builders ask for a JSA before you start. Photocopied forms filled in the cab with risk ratings nobody can read do not hold up when the site checks the pack. A usable JSA is site-specific, step-based, signed by the people doing the work, and finished before tools come out.
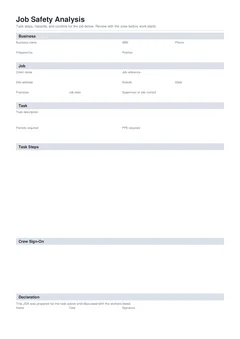
This guide is about writing craft: how to break the job into steps people can follow, how to name hazards and controls that match the ground, and how to get crew sign-on that means something. Open the Job Safety Analysis when you are ready to fill. Related templates: building forms hub. Document mix: SWMS vs JSA vs Take 5.
What is a JSA?
Safe Work Australia frames risk management as identify hazards, assess risks, control risks, and review controls. A job safety analysis (sometimes called a job hazard analysis) applies that thinking to one job package by walking it step by step.
Use a JSA when the principal or client requires one before start, when the work has several steps and more than one worker, when you want a written method broader than a short Take 5, or when your company standard uses JSA for every new work package.
A JSA is not automatically a Safe Work Method Statement. High risk construction work still needs a SWMS under model WHS rules. Details: When is a JSA required and JSA vs SWMS for builders.
Who prepares a JSA and who signs on?
Preparer: supervisor, leading hand, or business owner responsible for the package.
Crew sign-on: workers who reviewed the JSA and will do the work. Signatures without a conversation are a weak system. Walk the steps, answer questions, then sign.
Declaration: the person authorised to sign the finished document for the business, often the same preparer after crew review.
Job details that must be true
Use the real site address and client name the principal already uses. Job date should be the day this JSA applies. Write the overall task in plain language: "Install first-floor windows, east elevation, scaffold access" beats "windows".
List permits required (hot work, confined space, excavation, isolation, or site-specific). List PPE required for the package so crew sign-on covers the same gear the steps assume. Wrong suburb or blank permits are common reject reasons; see 11 JSA blanks principals look for.

Write steps people can follow
Each step needs five things: what happens in order, what can go wrong, a risk rating for this site, how you control it, and who applies the control.
Keep steps in work order. Too few steps hide hazards. Too many steps bury the crew in noise. Aim for the real sequence a leading hand would brief.
Safe Work Australia expects controls that eliminate or minimise risk so far as reasonably practicable. Prefer isolation, barriers, and engineering controls before relying only on PPE when stronger options exist.
Risk ratings that match this site
Rate the residual or current risk honestly for the conditions today, not for a perfect site. A step that is Low on a vacant lot may be High next to live traffic or other trades. If the rating is High or Extreme, the control must be strong enough that you are willing to start. If it is not, change the method before declaration.
Who owns each control
Empty who fields are blanks advisors look for. Put a name or clear role on isolation, exclusion, plant interfaces, and any High or Extreme step.
Example: first-floor window install
Package: install windows on a two-storey renovation. Scaffold is up. Other trades paint inside. Shortened for the article; your JSA should match your method.
-
Set up work area and exclusion below scaffold
Hazards: falling objects, public or trade access. Controls: barriers, signage, brief other trades. Who: leading hand. -
Check scaffold and access
Hazards: incomplete bays, poor access. Controls: visual check, no access until scaffold is fit. Who: leading hand. -
Lift and position frames
Hazards: manual handling, pinch points. Controls: two-person lift or mechanical aid, clear path. Who: named installers. -
Fix frames and flashings
Hazards: hand tools, edge work. Controls: tool condition check, stay inside protected zone. Who: installers. -
Clean up and hand over openings
Hazards: debris, open edges left unsafe. Controls: remove waste, confirm barriers remain. Who: leading hand.
If fall risk greater than two metres applies as high risk construction work, prepare a SWMS as well and keep methods aligned.
Crew sign-on after a real walk-through
Keep sign-on with the steps: name, company, date, signature. That stops the common failure where steps live on one pad and signatures on another, then one goes missing.
Before people sign:
- Walk the steps against the real work face where practical
- Point out controls that must be in place before each step
- Confirm permits and PPE
- Invite questions and update steps if the method changes
New starters mid-job should sign on after the same review, not inherit a signature from someone who left. More: JSA crew sign-on and handover.
Declaration, download, file
When steps and sign-on are complete, fill declaration name, date, and signature. Preview the PDF. Check that long step lists are readable and that nothing critical is blank. Download and store against the job before work starts.
Reusing a JSA without lying about the site
You can duplicate a previous JSA as a draft for a similar package. Before reuse: change client, address, and date; rewrite any step that does not match this site; update permits, plant, and other trades; clear old crew sign-on and re-sign with today's people; re-declare.
Unchanged reuse on a different site is a common audit failure.
When the design is still moving
Residential jobs change. Write steps at the level of method, not millimetre detail that will be wrong tomorrow. Name hold points where work stops until the builder or engineer confirms. Re-open the JSA when a change affects access, plant, energy, or fall protection. Re-brief and re-sign the people affected.
A short revised JSA the morning of the change beats a perfect PDF for a method nobody is using.
How JSA sits with Take 5 and SWMS
- JSA: step-by-step analysis for the package
- Take 5: short personal pre-task check, often daily or on change
- SWMS: high risk construction work planning document when that duty applies
Keep one method of work across all three. If the Take 5 finds a change that affects the method, update the JSA and SWMS as required before continuing.
Related guides and forms
- When is a JSA required on construction sites
- 11 JSA blanks principals and safety advisors look for
- JSA crew sign-on and handover
- JSA vs SWMS for builders
- SWMS vs JSA vs Take 5
- How to complete a NSW SWMS on site
- How to complete a Take 5 on site
Official sources
- Manage risks (Safe Work Australia)
- Identify, assess and control hazards
- Model Code of Practice: How to manage work health and safety risks
- Prepare safe work method statement (SafeWork NSW)
Company procedures and principal packs can require JSAs on top of legal duties. They do not remove the SWMS duty for high risk construction work where it applies. You remain responsible for checking the work, the controls on site, and the downloaded PDF.